기존의 파일시스템은 모든 Client 노드가 하나의 물리적 볼륨을 공유하는 NFS 를 사용하고 있었습니다. NFS에 연결된 노드 수와 사용량이 증가하면서 NFS I/O 속도가 감소하고, 메타 데이터가 충돌하는 등 여러 문제가 발생했습니다. 아무리 하드웨어 레벨에서 RAID 6로 묶여있더라도, 100대의 노드에서 발생하는 모든 파일 입출력을 감당하는 것은 성능과 안정성에 문제가 있다고 판단했습니다. 여러 분산 파일 시스템을 조사한 후 glusterfs를 도입하기로 결정했습니다.
실험에 사용한 소스코드는 아래 깃허브 링크를 참고해주시기 바랍니다.
- https://github.com/deagwon97/glusterfs-performance
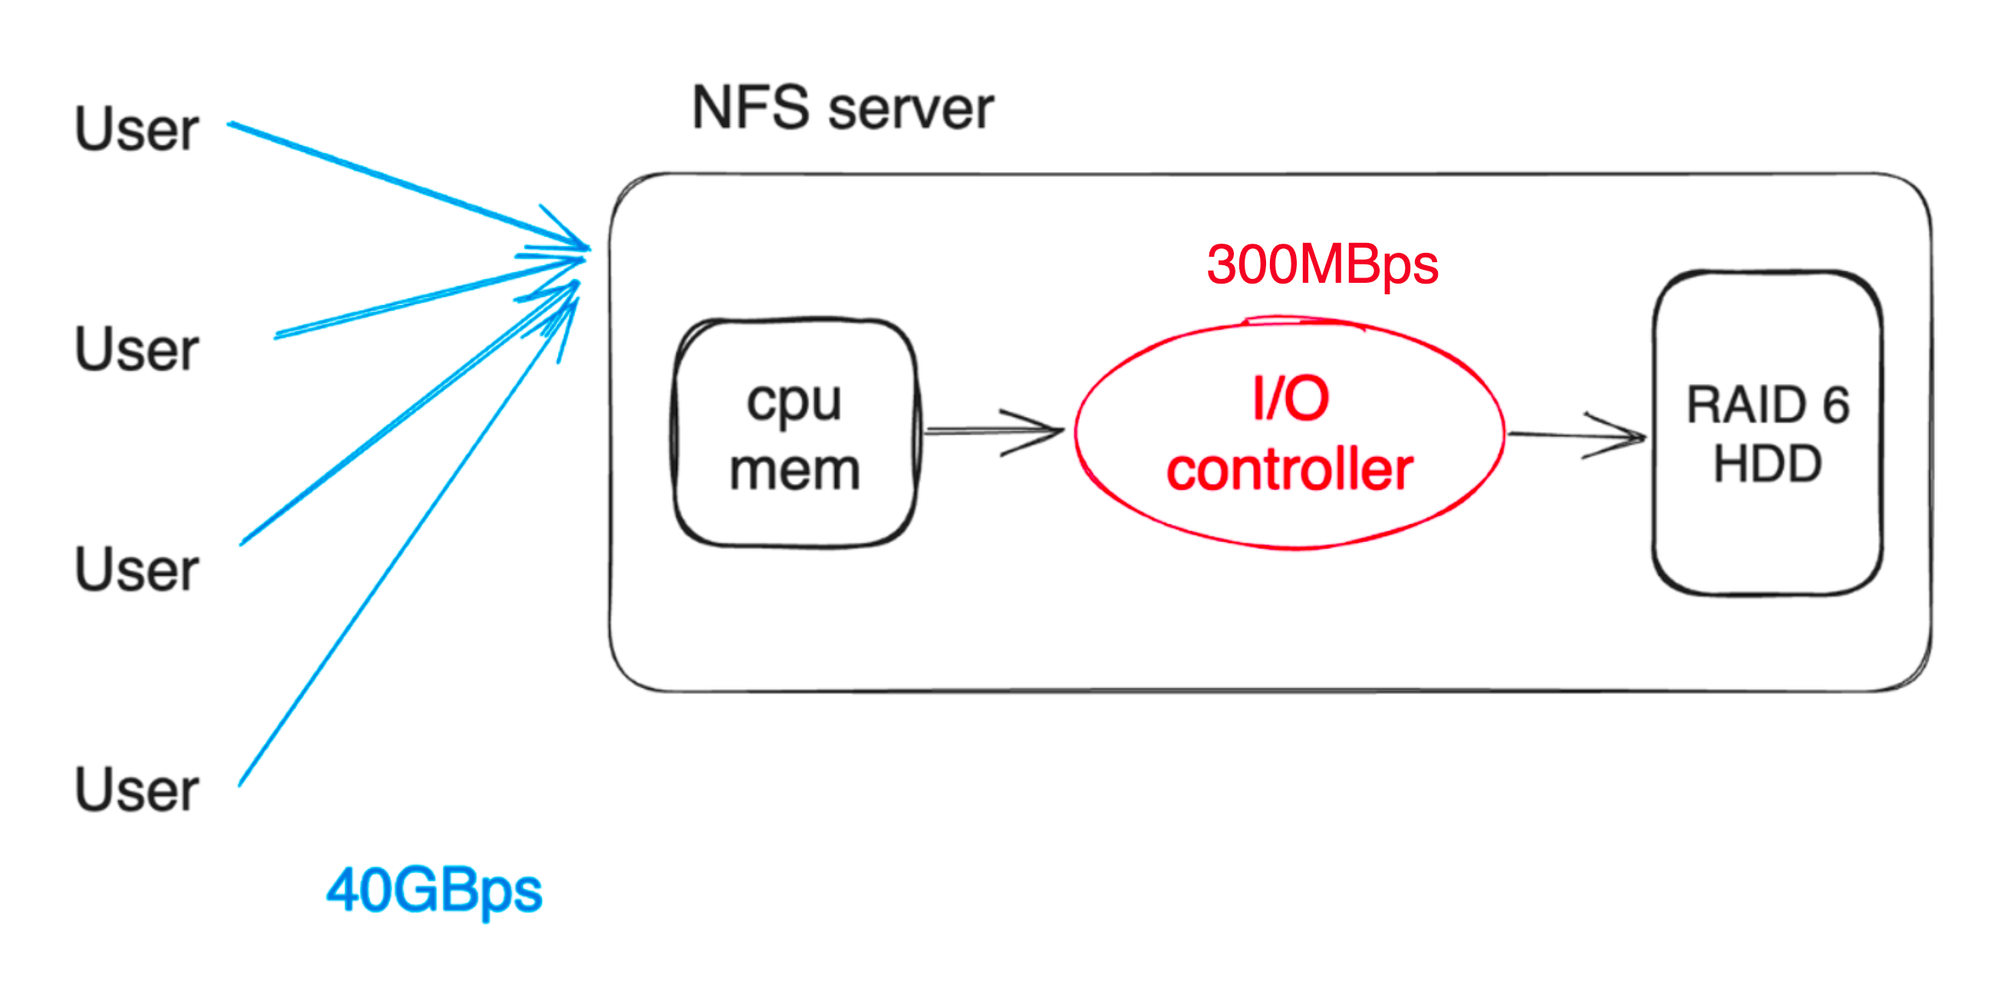
현재 사용하고 있는 클러스터는 40GBps(최소 20GBps ~ 최대 40GBps)의 네트워크 대역폭을 가지며 단일 NFS 서버의 I/O 컨트롤러 대역폭은 약 300MBps(RAID Controller, 64 bits width, 33MHz clock)입니다. 메모리 및 CPU 성능은 충분히 높기 때문에, 하드디스크 컨트롤러에서 I/O 병목이 발생한다는 것을 알 수 있습니다. 분산 파일 시스템은 이러한 I/O 컨트롤러 병목 현상을 일부 해소할 수 있습니다.
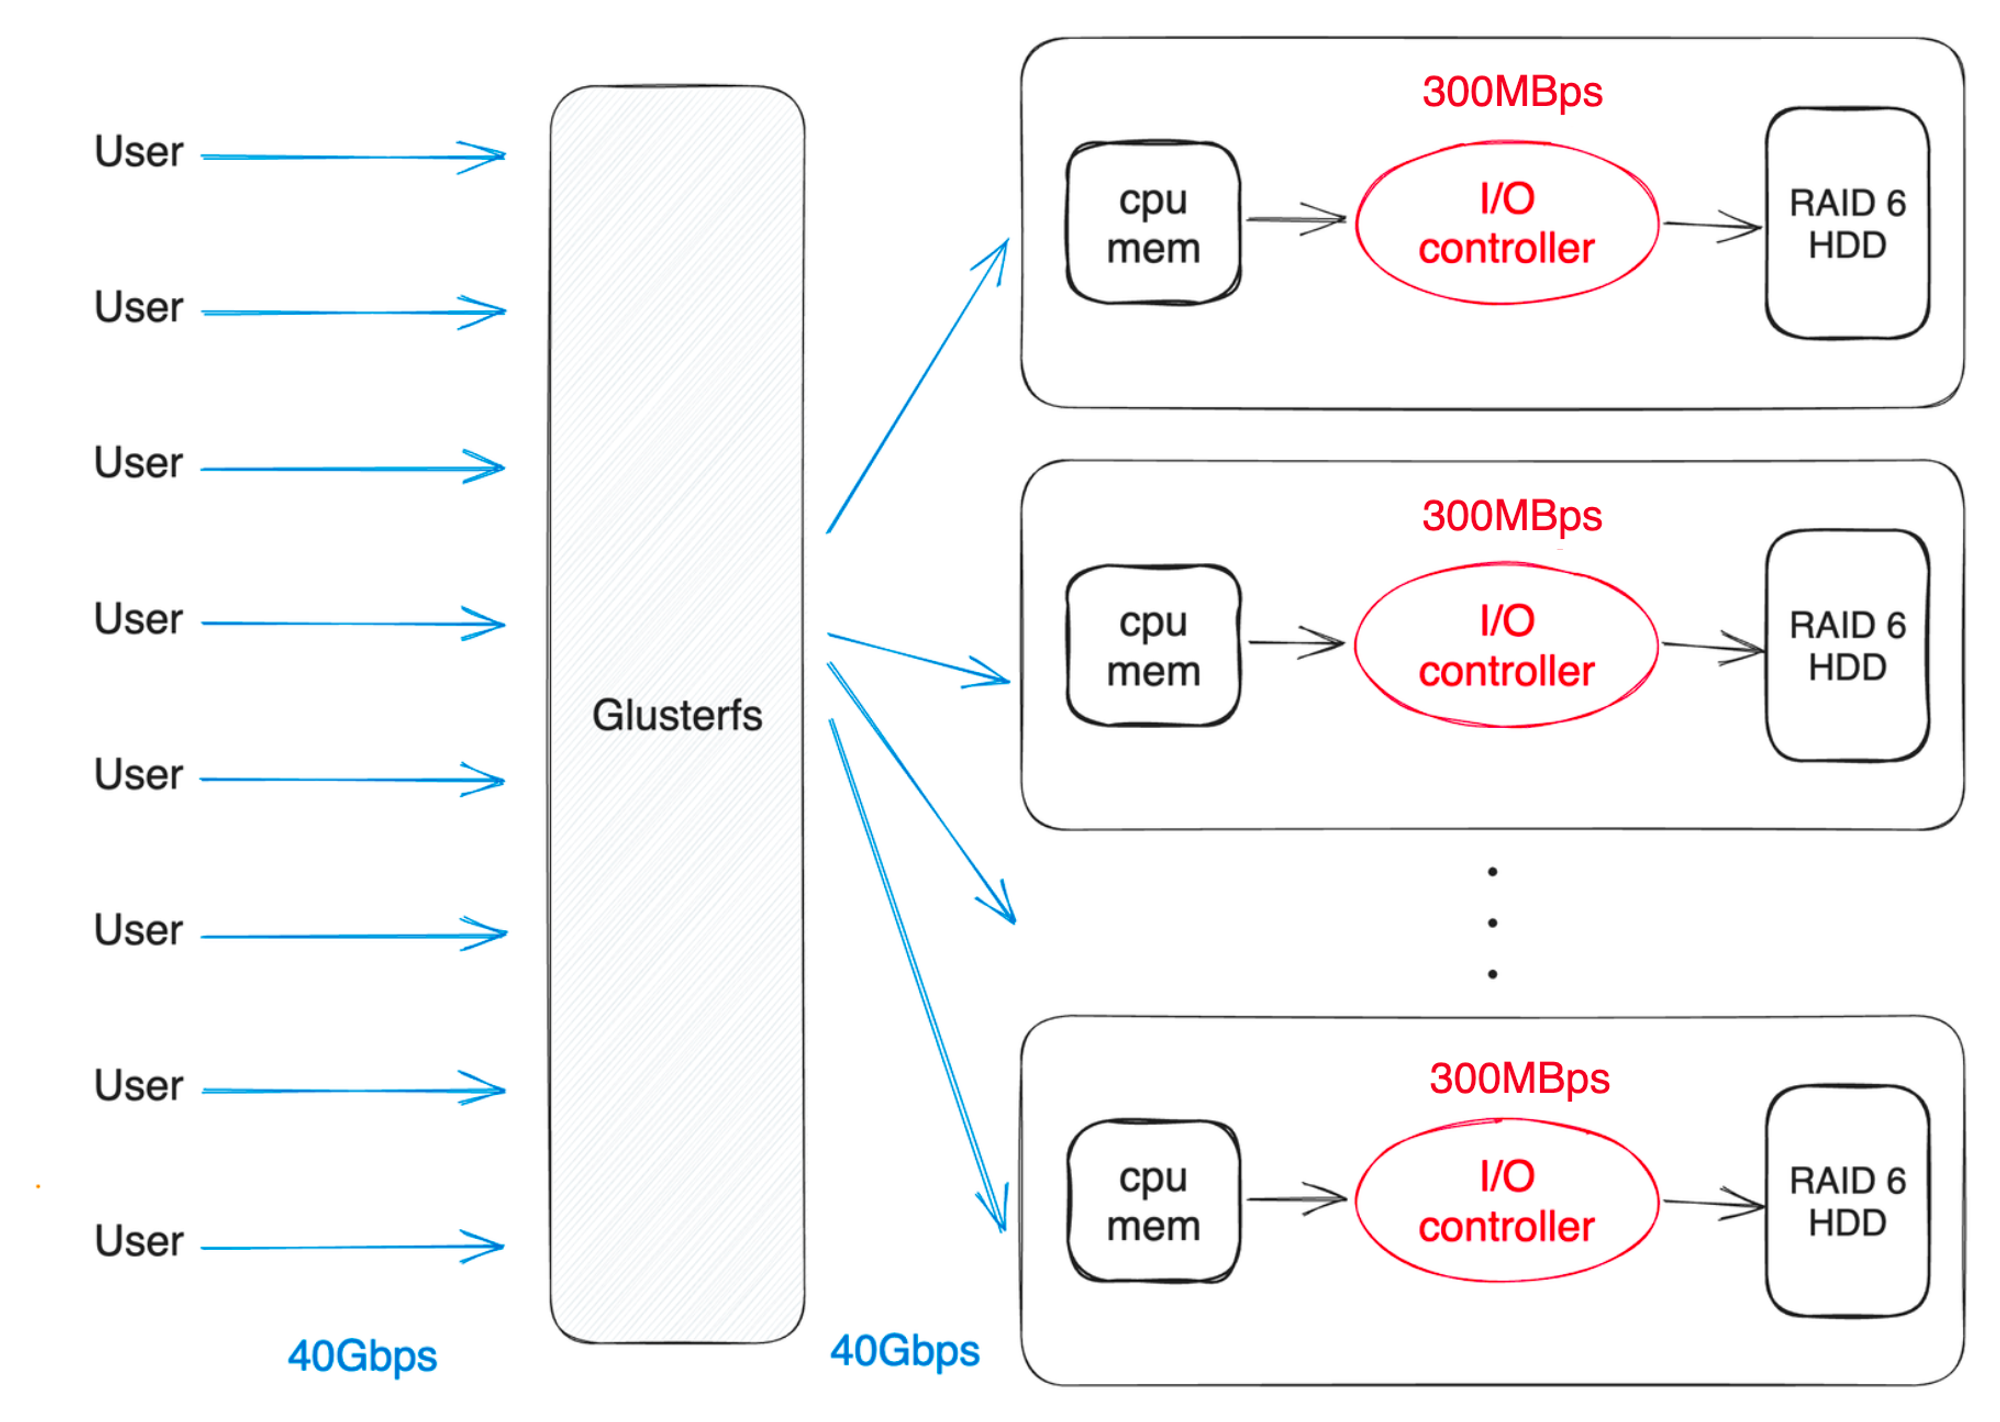
분산 파일 시스템은 NFS와 다르게 파일들을 여러개 노드에 분산하여 저장합니다. 파일을 저장하는 방식에 따라서 I/O 대역폭이 최대 “단일 I/O 대역폭 * 서버 수“ 만큼 올라갑니다. 또한 스토리지 공간과 성능을 최대로 사용하지 않고, erasure code나 데이터 복제를 사용하면 내결함성(Fault Tolerance)을 높일 수 도 있습니다.
glusterfs는 다양한 구조를 지원합니다. 성능을 극대화하는 조합(distribute), 안정성을 극대화하는 조합(replicated), 성능과 안정성을 추구하면서 저장공간 효율을 높이는 조합(dispersed) 등으로 볼륨을 구성할 수 있습니다. 현재 운행중인 클러스터에 가장 적합한 조합을 찾기위해 각 조합별 성능을 평가하는 실험을 진행했습니다.
glusterfs 란?
실험 소개에 앞서 glusterfs에서 사용되는 용어와 구조에 대해서 간단하게 알아보겠습니다.
| glusterfs는 클라우드 스토리지 및 미디어 스트리밍과 같은 데이터 집약적인 작업에 적합한 확장성있는 네트워크 파일 시스템입니다. |
-
Brick 이란?
Brick이란 Glusterfs의 기본 스토리지 단위 이며 리눅스 파일 시스템에서 폴더로 표현됩니다. 디스크 볼륨 전체를 brick으로 사용할 수도 있고, 디스크 볼륨을 나누어 여러개의 brick을 구성할 수도 있습니다.
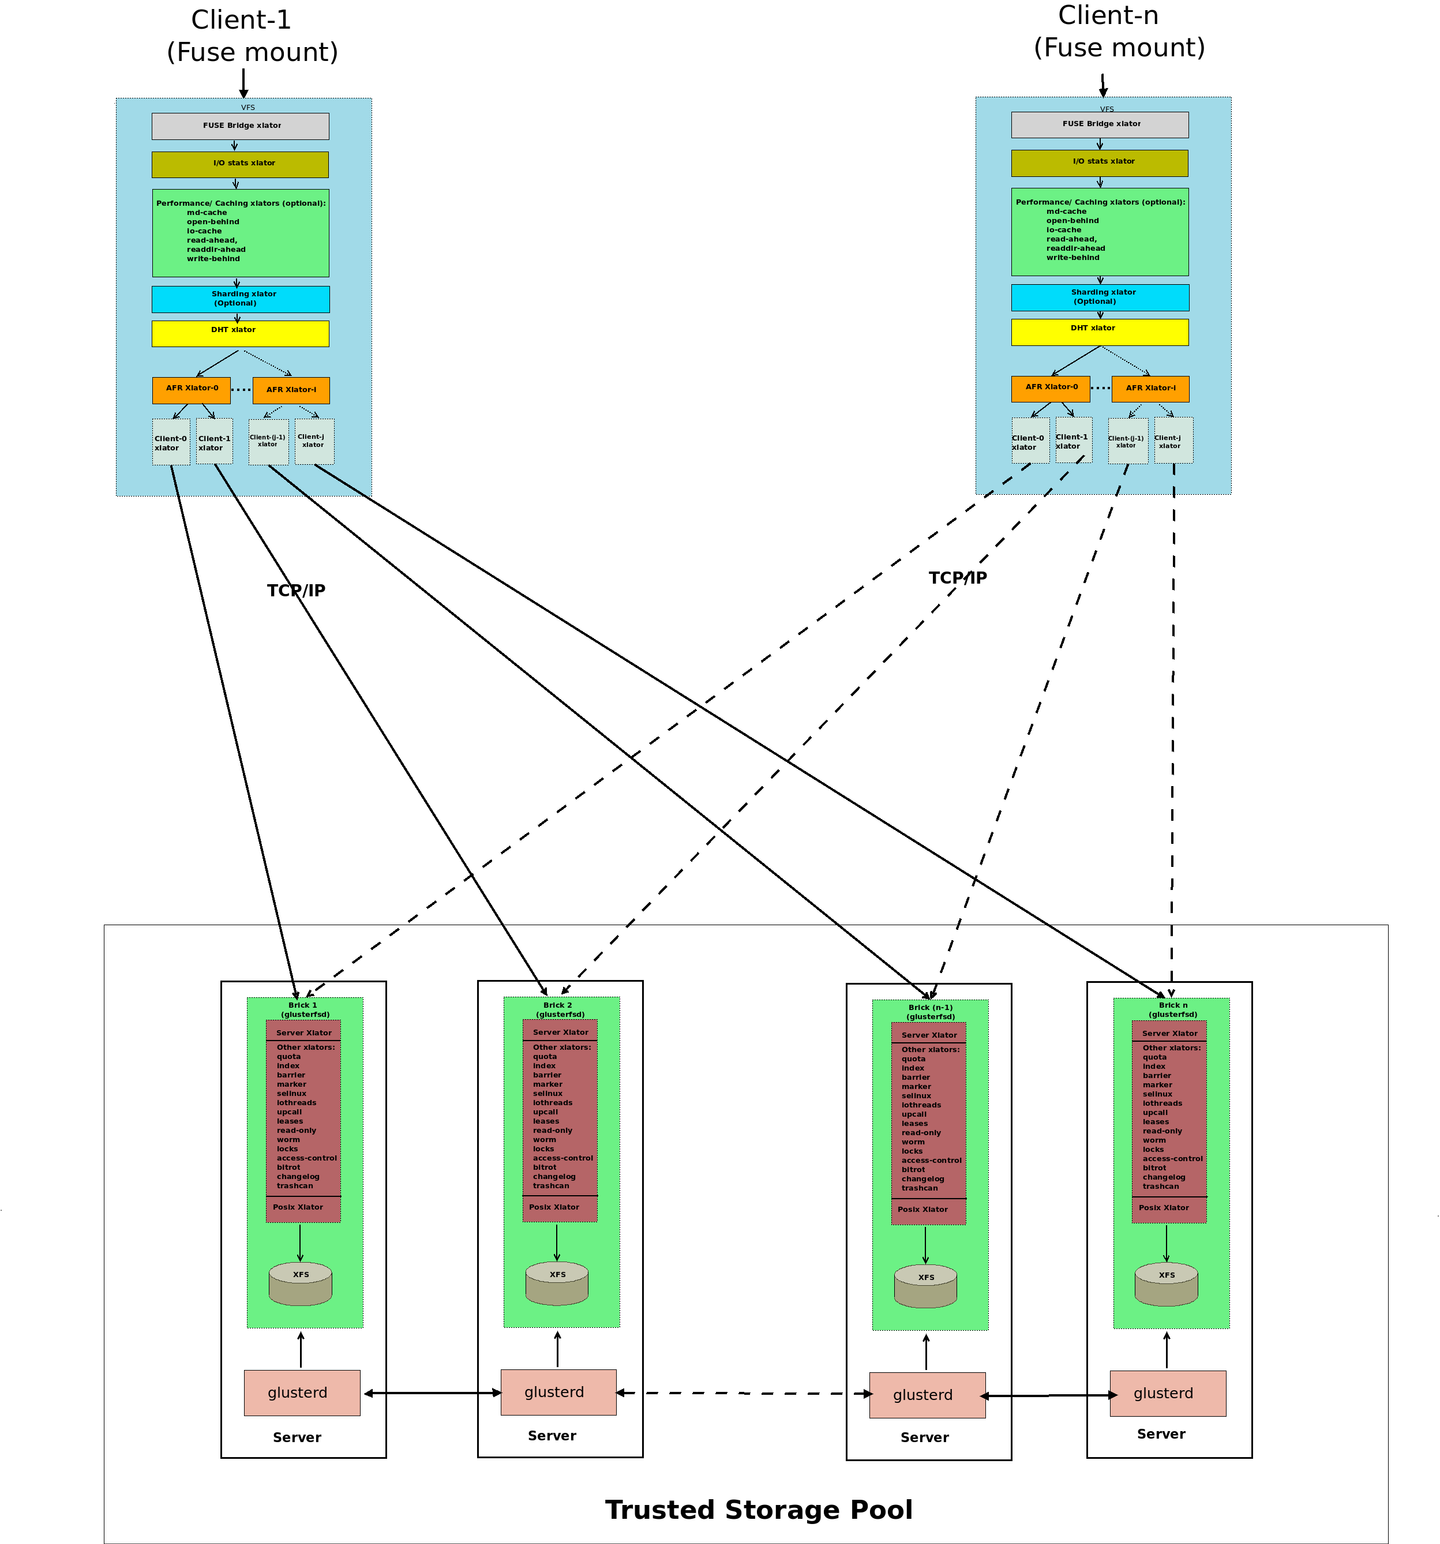
각 스토리지 서버에서 관리 데몬(glusterd)이 서로 통신하며 brick process(glusterfsd)를 관리합니다. brick process(glusterfsd)는 기본 디스크 저장소(XFS Filesystem)에 접근해 전달받을 요청을 수행합니다. 사용자는 FUSE를 통해서 만들어진 gluster 파일 시스템에 마운트하여 데이터에 접근합니다. 각 노드들은 TCP/IP 혹은 RDMA 를 통해서 통신할 수 있습니다.
여러 기업과 기관에서 N PB 크기의 파일 시스템 볼륨을 구성하여 운영하는 사례를 찾아볼 수 있을 만큼, 높은 용량의 분산 파일 시스템을 구축할 수 있습니다.
glusterfs 볼륨 유형
앞에서 glusterfs는 다양한 볼륨 유형 갖는다고 언급했습니다. 유형별 구조와 특징을 알아보겠습니다.
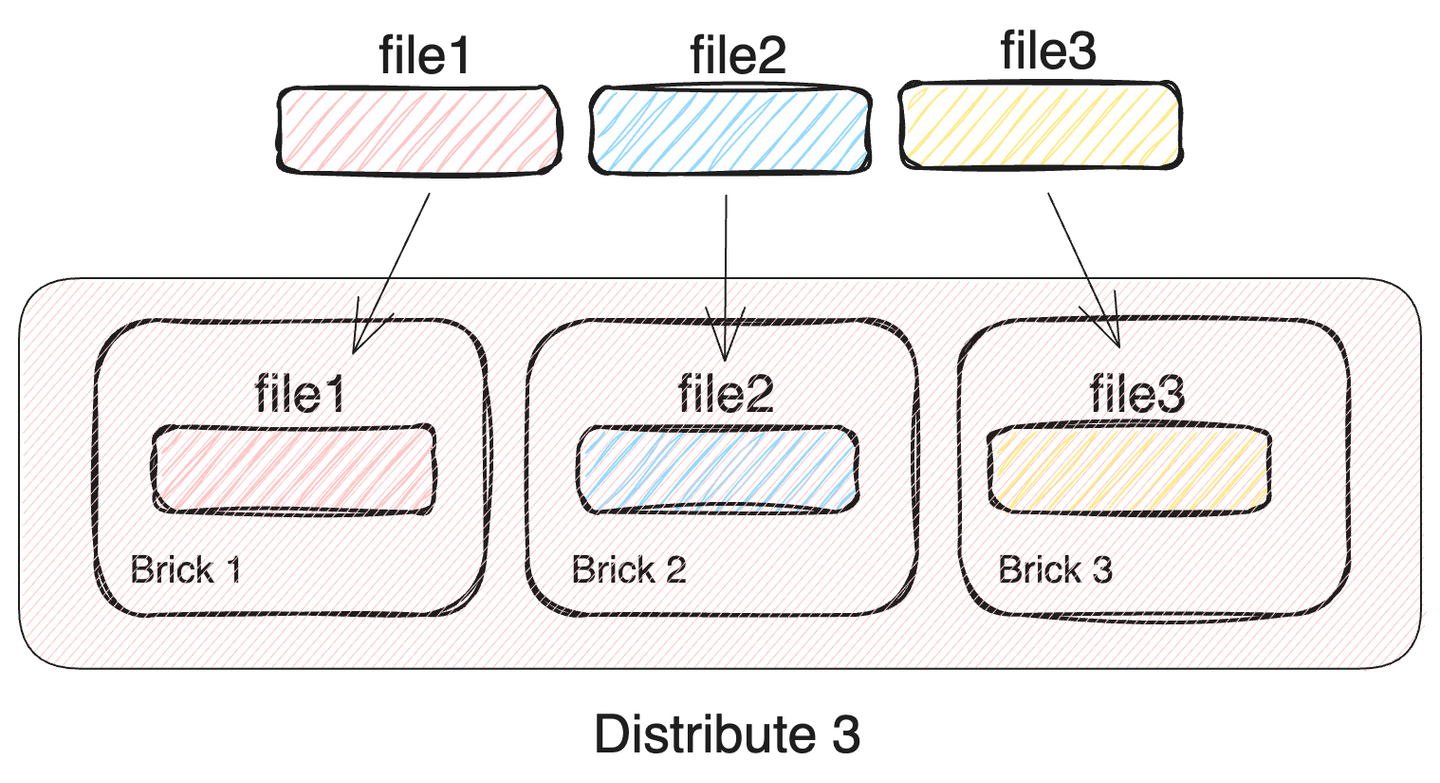
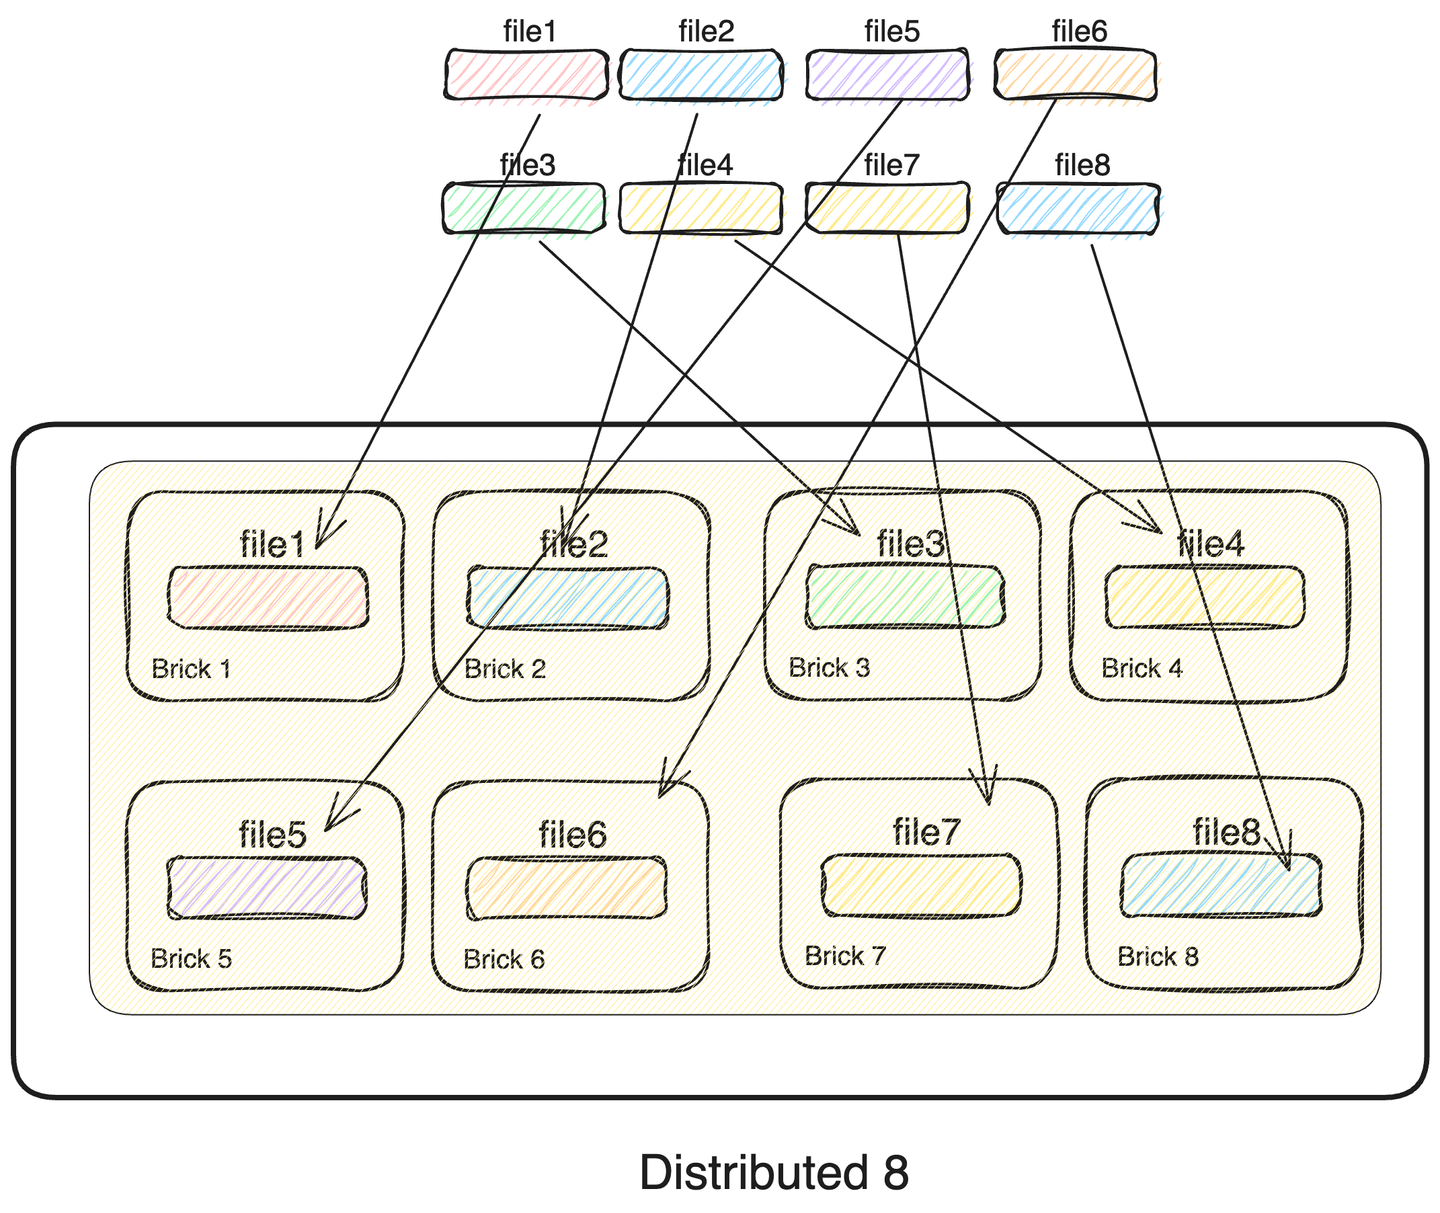
1. Distributed Glusterfs Volume
glusterfs의 가장 기본적인 형태입니다. 저장할 파일들을 각각 서로다른 brick에 나누어 저장합니다. brick을 추가하는 만큼 저장공간을 그대로 확장할 수 있습니다. 또한 서로 다른 brick에 io 컨트롤러가 각각 존재한다면, 다중 파일의 IO 속도가 brick의 수 만큼 증가합니다. 한마디로 가장 안정성이 떨어지지만, 가장 높은 성능을 보이는 볼륨입니다.
- 여러개의 파일들을#bricks 만큼 나누어 각각의 brick에 저장
- 하나의 brick 이라도 손실될 경우, 데이터 무결성이 깨짐
- 전체 클러스터 용량 = 단일 brick 용량 *#bricks
- 네트워크 대역폭은 NFS와 동일하게 소비
- 단일 파일 I/O 속도 = brick I/O 속도
- 다중 파일 동시 I/O 속도 = brick I/O 속도 *#bricks (네트워크 속도는 고려하지 않음)
2. Replicated Glusterfs Volume
극단적인 안정성을 추구하는 볼륨입니다. 모든 파일들을 각 brick에 저장합니다. 따라서 모든 brick이 동시에 고장나지 않는 이상 전체 데이터의 무결성이 지켜집니다. 하지만, brick 수를 늘리더라도 저장할 수 있는 데이터의 양은 고정됩니다. 또한 파일을 복제하는 overhead와 네트워크 사용량의 증가로 IO 속도는 감소합니다.
- 사용가능한 전체 클러스터 용량 = 단일 brick 용량
- 다중/단일 파일 I/O 속도 = brick I/O 속도 - 파일 복제 속도
- 네트워크 대역폭을#bricks 배 소비
- 파일을#bricks 만큼 복제하여 각 brick에 저장
- 모든 brick이 고장나지만 않으면 전체 데이터를 복구 가능

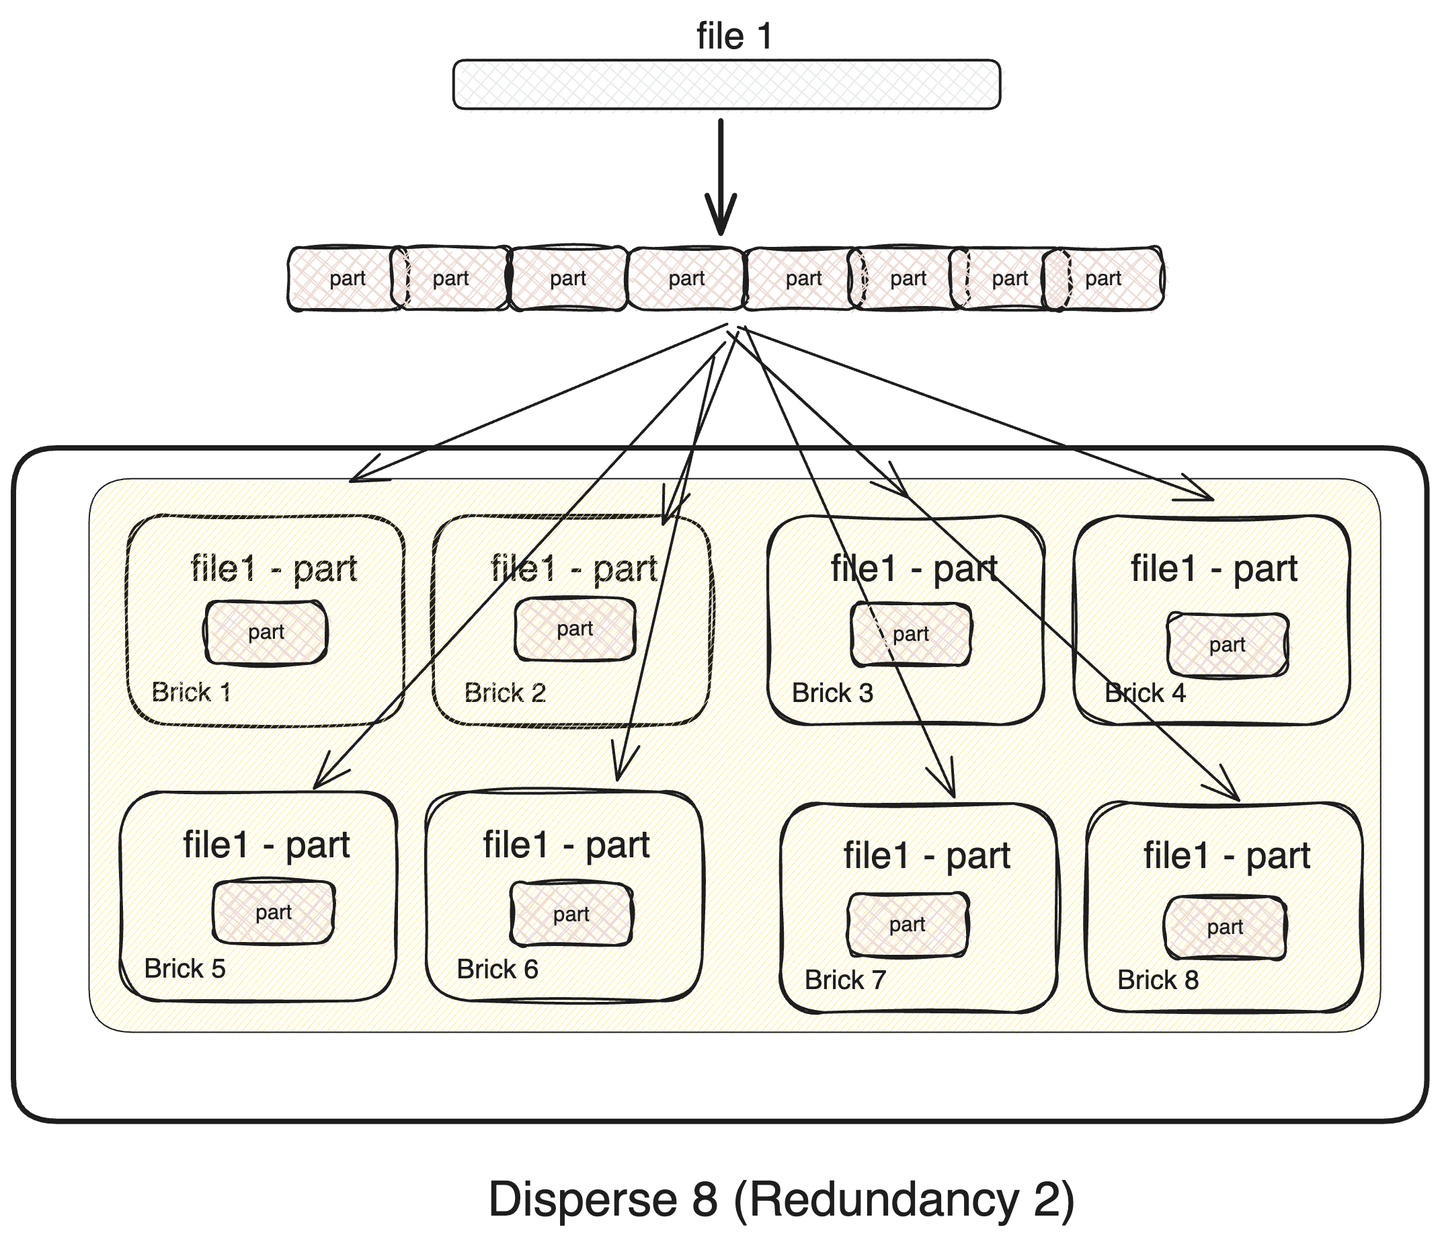
3. Dispersed Glusterfs Volume
Dispersed glusterfs volume은 안정성과 가용성을 적절히 혼합한 형태의 볼륨입니다. 이 volume은 삭제 코드(eraser code)를 기반으로 동작합니다. 하나의 파일을 brick 수 만큼 분할하고 신뢰성을 보장하기 위한 정보를 추가해 부분 데이터를 생성합니다. redundancy 데이터를 추가하면서 데이터의 중복이 발생하기 때문에 사용할 수 있는 최대 스토리지 용량은 감소하지만, redundancy 수 만큼 brick이 고장난다고 해도, 전체 데이터를 복구할 수 있습니다.
- redundancy : 허용되는 실패 brick 수
- 파일을 분할, 복제하는 overhead 존재
- 전체 클러스터 용량 = 단일 brick 용량 * (#bricks - redundancy )
- 네트워크 대역폭을 #bricks / (#bricks - redundancy ) 배 소비
- redundancy 만큼의 birck이 손실되어도 데이터 무결성(data integrity)이 유지
- 파일 읽기 쓰기 속도 = 단일 brick 속도 * (#bricks) / (redundancy + 1 + alpha)
- alpha: 파일 분할, 복제 overhead

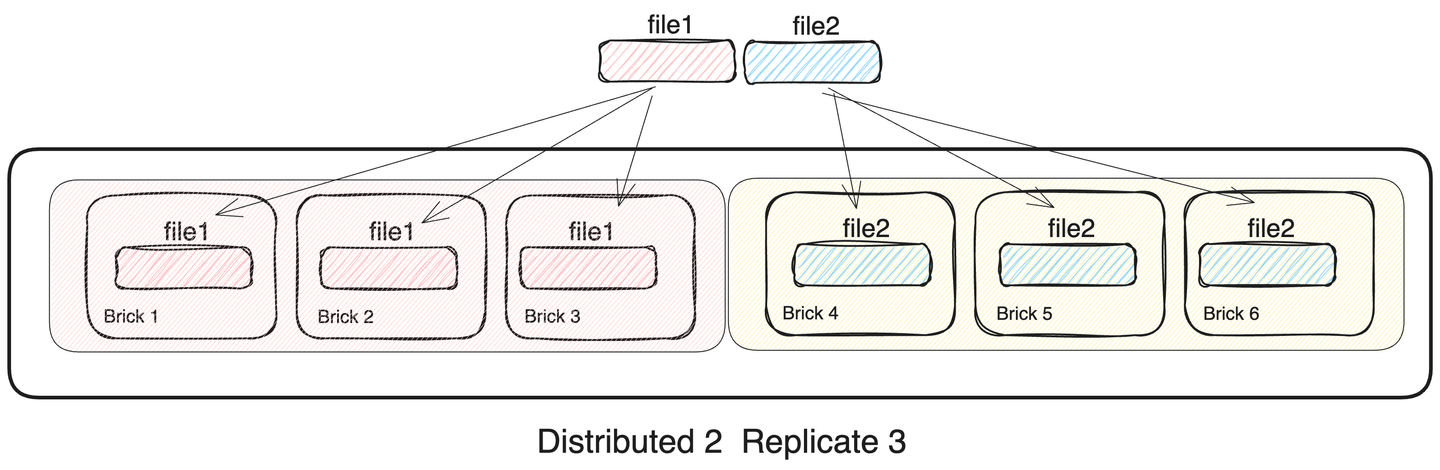
4. Distributed Replicated Glusterfs Volume
distributed 볼륨은 replicated 볼륨과 혼합하여 사용할 수 도 있습니다. distributed set 마다 서로 다른 파일들을 저장하면서 distributed set 속의 brick들은 replicated 볼륨으로 구성되어 있습니다. 하나의 distributed set 전체가 고장난다면 데이터 무결성이 손상되는 구조이지만, distributed set 내부의 모든 brick들이 데이터를 서로 중복해서 가지기 때문에 높은 안정성을 보입니다. 이 처럼 Distributed Replicated 볼륨은 dispersed 볼륨과 유사하게 안정성과 성능 모두 챙길 수 있습니다.
- distributed와 replicated를 결합한 분산 스토리지
- distributed의 구성 요소로 brick이 아닌 replicated 스토리지를 사용
- replicated set에서는 replicated 만큼 동일한 데이터를 복제
- 전체 스토리지 용량
- 단일 brick 용량 * (#bricks / replica 수 )
- 네트워크 대역폭 (#bricks / replica 수 ) 배 소비
- 단일 파일 I/O 속도 = 단일 brick 속도 - overhead
- 다중 파일 I/O 속도 = 단일 파일 I/O 속도 * (distributed size)
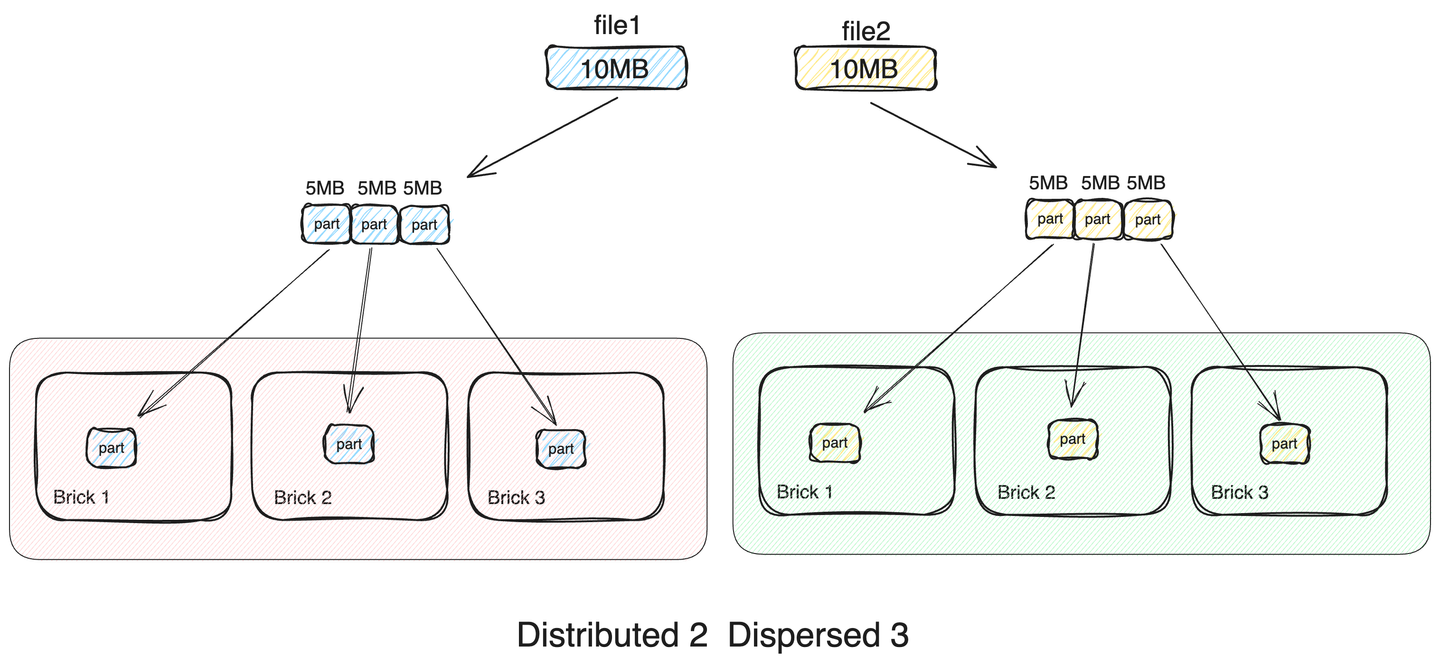
5. Distributed Dispersed Glusterfs Volume
마지막 조합은 distributed와 dispersed를 결합한 volume입니다. distributed replicated volume과 다르게 distributed set의 brick들은 dispersed volume으로 구성됩니다.
- distribute와 disperse를 결합한 분산 스토리지
- distribute의 구성 요소로 brick이 아닌 dispersed 스토리지를 사용
- 파일들은 distributed 크기 만큼 나눠져 각 dispersed set에 저장
- 전체 클러스터 용량 = 단일 brick 용량 * ( dispersed size - redundancy )
- 네트워크 대역폭 ( dispersed size - redundancy ) / dispersed size 배 소비
- 단일 파일 I/O 속도 = 단일 brick 속도 * (dispersed size) / (redundancy + 1 + alpha)
- 다중 파일 I/O 속도 = 단일 파일 I/O 속도 * (distributed size)
실험 구성
실험 조합 결정
14TB 하드디스크 3개를 RAID 5로 구성한 하나의 볼륨을 Brick으로 사용합니다. 노드 마다 하나의 Brick을 가지도록 구성하고 4개의 서로다른 glusterfs 볼륨을 구성하여 성능을 비교했습니다. 또한 기존의 nfs 파일 시스템도 동일한 조건에서 어떤 성능이 나오는지 함께 확인했습니다.
1. Distributed 8
파일을 8개의 노드에 모두 분산하여 저장하는 방식입니다. 단일 파일 I/O 성능은 nfs와 유사하지만, 다중 파일을 동시에 I/O할 경우, I/O controller를 동시에 사용할 수 있기 때문에, 대역폭이 최대 8배로 증가할 것으로 예상합니다.
2. Disperse 8 (Redundancy 2)
하나의 파일을 8개로 쪼개고 erasure code를 추가해 8개 노드에 저장하는 방식입니다. 파일의 크기가 작을 경우에는 단일 볼륨보다 성능이 떨어지지만, 파일의 크기가 커지면, 단일 파일이라도 io 속도가 증가할 것으로 예상됩니다.
3. Distributed 4 Replicated 2
파일들을 4개의 replicated set에 분산해서 저장하는 방식입니다. 단일 파일의 경우 파일을 복제하는 overhead가 존재해 단일 볼륨보다는 속도가 느릴 것으로 보입니다. 특히 파일의 크기가 커질 수록 복제 overhead가 증가하여 대역폭이 감소할 것으로 예상합니다. 하지만, 크기가 작은 다중 파일은 4개의 분산 replicated set에 나누어 저장되기 때문에 높은 성능을 보일 것으로 보입니다.

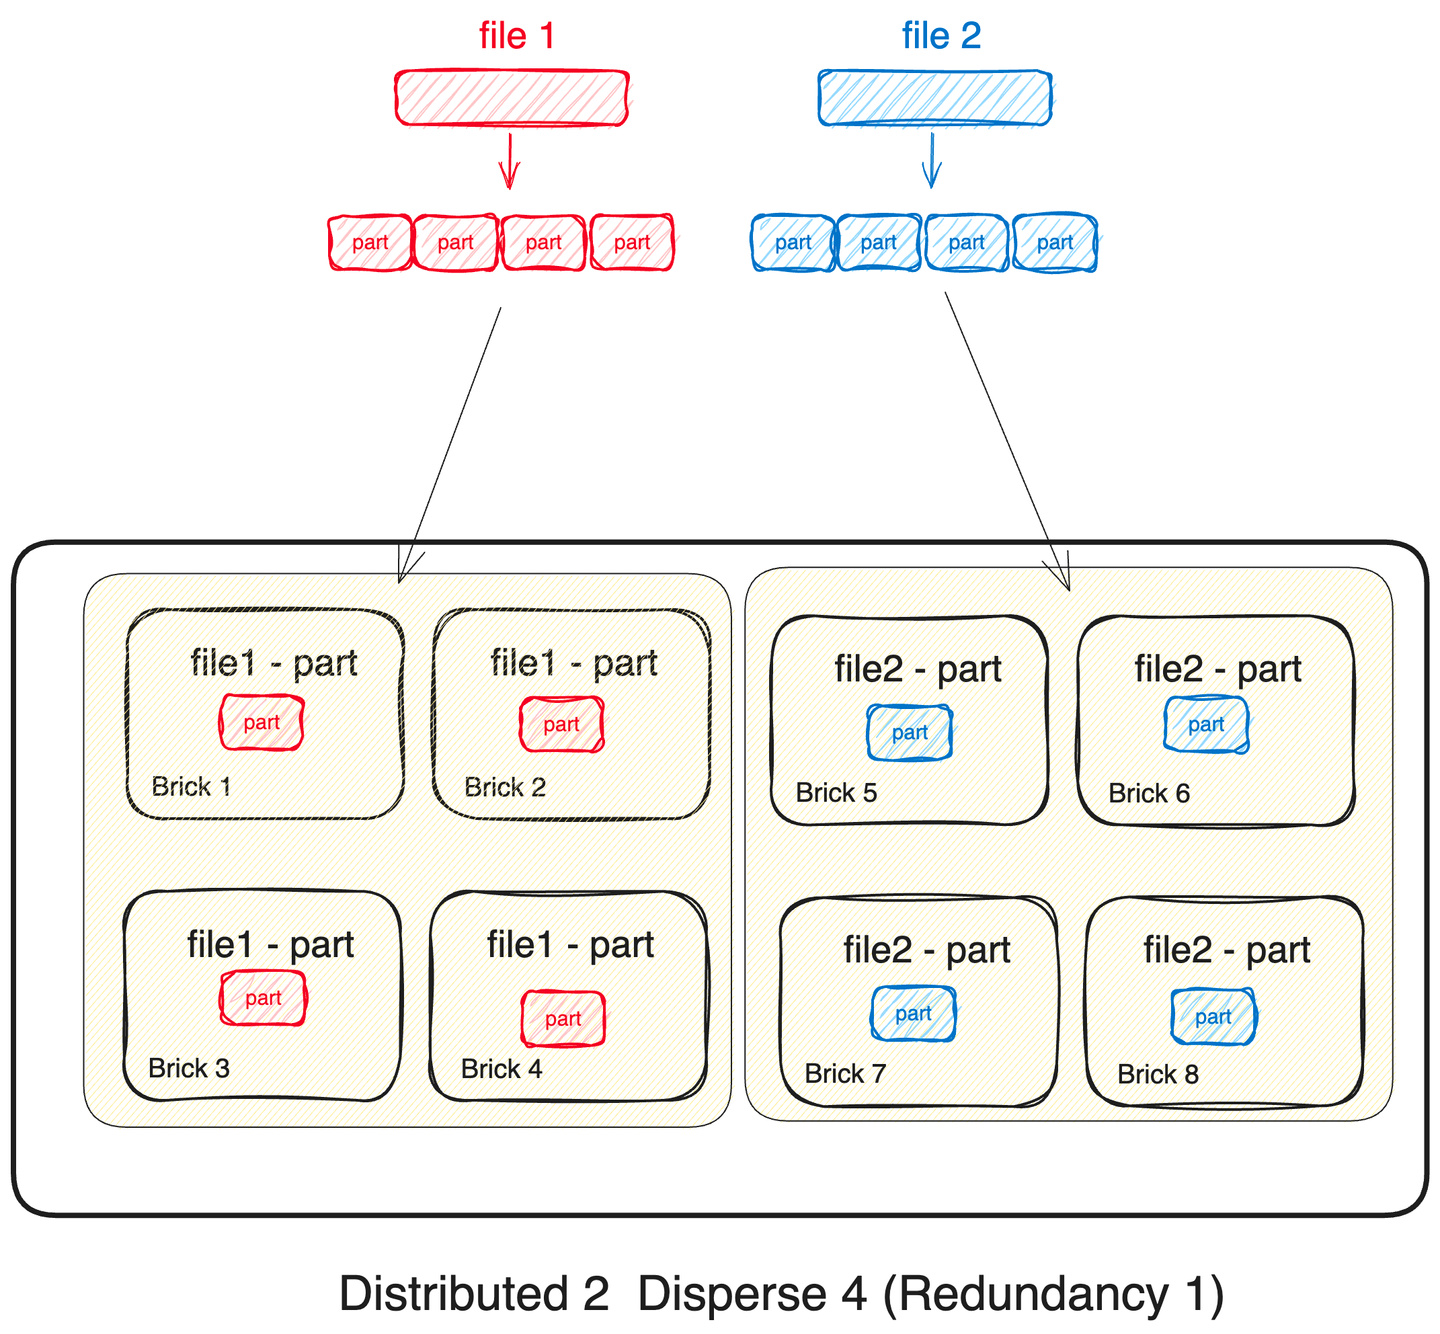
4. Distributed 2 Disperse 4 (Redundancy 1)
파일들을 2개의 disperse set으로 나누어 저장합니다. disperse set에서는 단일 파일이 각각 4개의 조각으로 분할되어 각 볼륨에 저장됩니다. 파일의 수와 크기가 크다면 높은 대역폭을 보일 것으로 예상합니다.
실험 환경 구성
1. gluster volume 생성
이제 8개 노드에 gluster를 설치하고 4가지 gluster volume을 생성합니다. 이후 별도 client 노드에 gluster volume들을 마운트하여 실험을 진행합니다.
# n001 ~ n008 노드에 gluster volume 설정

# 1. 모든 노드에 gluster 설치
yum install centos-release-gluster
yum install glusterfs-server

# 2. /etc/glusterfs/glusterd.vol 파일 생성
mkdir -p /etc/glusterfs
cat << EOF > /etc/glusterfs/glusterd.vol
volume management
    type mgmt/glusterd
    option working-directory /var/lib/glusterd
    option transport-type socket
    option transport.socket.keepalive-time 10
    option transport.socket.keepalive-interval 2
    option transport.socket.read-fail-log off
    option transport.socket.listen-port 24007
    option ping-timeout 0
    option event-threads 1
    option max-port  60999
end-volume
EOF
systemctl start glusterd
systemctl start glusterfsd

# 3. /dev/sda xfs으로 포맷하고 /mnt/gluster 경로에 마운트
mkfs.xfs /dev/sda -f
mkdir -p /mnt/gluster
mount /dev/sda /mnt/gluster

# 4. gluster peer prove
ssh n001
gluster peer probe n002
gluster peer probe n003
gluster peer probe n004
gluster peer probe n005
gluster peer probe n006
gluster peer probe n007
gluster peer probe n008

# 볼륨 생성
gluster volume create dp8rd2 disperse 8 redundancy 2 transport tcp \
n001:/mnt/gluster/dp8rd2 \
n002:/mnt/gluster/dp8rd2 \
n003:/mnt/gluster/dp8rd2 \
n004:/mnt/gluster/dp8rd2 \
n005:/mnt/gluster/dp8rd2 \
n006:/mnt/gluster/dp8rd2 \
n007:/mnt/gluster/dp8rd2 \
n008:/mnt/gluster/dp8rd2
gluster volume start dp8rd2

gluster volume create dt4rp2 replica 2 transport tcp \
n001:/mnt/gluster/dt4rp2 \
n002:/mnt/gluster/dt4rp2 \
n003:/mnt/gluster/dt4rp2 \
n004:/mnt/gluster/dt4rp2 \
n005:/mnt/gluster/dt4rp2 \
n006:/mnt/gluster/dt4rp2 \
n007:/mnt/gluster/dt4rp2 \
n008:/mnt/gluster/dt4rp2
gluster volume start dt4rp2

gluster volume create dt8 transport tcp \
n001:/mnt/gluster/dt8 \
n002:/mnt/gluster/dt8 \
n003:/mnt/gluster/dt8 \
n004:/mnt/gluster/dt8 \
n005:/mnt/gluster/dt8 \
n006:/mnt/gluster/dt8 \
n007:/mnt/gluster/dt8 \
n008:/mnt/gluster/dt8
gluster volume start dt8

gluster volume create dt2dp4rd1 disperse 4 redundancy 1 transport tcp \
n001:/mnt/gluster/dt2dp4rd1 \
n002:/mnt/gluster/dt2dp4rd1 \
n003:/mnt/gluster/dt2dp4rd1 \
n004:/mnt/gluster/dt2dp4rd1 \
n005:/mnt/gluster/dt2dp4rd1 \
n006:/mnt/gluster/dt2dp4rd1 \
n007:/mnt/gluster/dt2dp4rd1 \
n008:/mnt/gluster/dt2dp4rd1

gluster volume start dt2dp4rd1
2. gluster volume mount
client노드도 gluster를 설치하고 4가지 gluster volume을 마운트 합니다.
ssh client

# 1. gluster 설치
yum install centos-release-gluster

# 2. volume mount
mkdir -p /client/gluster/dp8rd2
mkdir -p /client/gluster/dt2dp4rd1
mkdir -p /client/gluster/dt4rp2
mkdir -p /client/gluster/dt8

mount -t glusterfs n001:dp8rd2 /client/gluster/dp8rd2
mount -t glusterfs n001:dt2dp4rd1 /client/gluster/dt2dp4rd1
mount -t glusterfs n001:dt4rp2 /client/gluster/dt4rp2
mount -t glusterfs n001:dt8 /client/gluster/dt8
3. glusterfs cache off
cache 없이 단순히 file I/O의 성능을 측정하기 위해서 생성한 4개의 gluster volume의 cache설정을 모두 off 했습니다.
gluster volume list
gluster volume set dt8 performance.write-behind off
gluster volume set dp8rd2 performance.write-behind off
gluster volume set dt4rp2 performance.write-behind off
gluster volume set dt2dp4rd1 performance.write-behind off

gluster volume set dt8 performance.read-ahead off
gluster volume set dp8rd2 performance.read-ahead off
gluster volume set dt4rp2 performance.read-ahead off
gluster volume set dt2dp4rd1 performance.read-ahead off

gluster volume set dt8 performance.cache-invalidation on
gluster volume set dp8rd2 performance.cache-invalidation on
gluster volume set dt4rp2 performance.cache-invalidation on
gluster volume set dt2dp4rd1 performance.cache-invalidation on
3. 실험 소스 코드
실험은 3개의 스크립트로 진행했습니다.
multiple.sh
#!/bin/bash

test_io() {

    local vol=$1
    local bs=$2
    local separately_count=$3

   # pids=()
    commands=()

    mkdir -p $vol

    rm -rf $vol/testfile*
    rm -rf ./log/log*

    PIPE=my_sync_pipe
    mkfifo $PIPE

    local i=1
    for (( i=1; i<=$separately_count; i++ ))
    do
        (
            read -r < $PIPE
            dd if=/dev/zero of=$vol/testfile$i bs=$bs count=1  2>> ./log/log$i
        ) &
    done

    for i in $(seq 1 $NUM_PROCESSES); do
        echo "Go" > $PIPE
    done

    wait
    rm $PIPE

    rm -rf $vol/testfile*
    return 0
}

calculate_io_bandwidth_average(){
    declare -A unit_map
    unit_map=(
    ["GB/s"]=$((1024 * 1024 * 1024))
    ["MB/s"]=$((1024 * 1024))
    ["kB/s"]=$((1024))
    )
    report=(``cat ./log/log* | grep copied | awk '{ print $8":"$9}'``)
    length=${#report[@]}
    sum_bandwith=0
    for line in ${report[@]}
    do
    value=``echo $line | awk -F":" '{print $1}'``
    unit=``echo $line | awk  -F":" '{print $2}'``

    bandwithd=$(echo $value ${unit_map[$unit]} | awk '{printf "%4.3f\n",$1*$2}')
    sum_bandwith="$( bc <<<"$sum_bandwith + $bandwithd" )"
    done

    avg_bandwidth=$(echo $sum_bandwith $length | awk '{printf "%4.3f\n",$1/$2}')
    sum_mb_bandwidth=$(echo $sum_bandwith ${unit_map["MB/s"]} | awk '{printf "%4.3f\n",$1/$2}')
    avg_mb_bandwidth=$(echo $avg_bandwidth ${unit_map["MB/s"]} | awk '{printf "%4.3f\n",$1/$2}')

    echo "$avg_bandwidth $avg_mb_bandwidth $sum_mb_bandwidth"
}

echo_result(){
    local vol=$1
    local bs=$2
    local separately_count=$3
    local avg_bandwidth=$4
    local avg_mb_bandwidth=$5
    local sum_mb_bandwidth=$6
    echo "vol=$vol, bs=$bs, separately_count=$separately_count, $avg_bandwidth Bytes/s, $avg_mb_bandwidth MB/s, $sum_mb_bandwidth MB/s"
}

test_single_bs(){
    local vol=$1
    local bs=$2
    local separately_count=$3

    test_io $vol $bs $separately_count
    local bw_list=``calculate_io_bandwidth_average``

    local avg_bandwidth=``echo $bw_list | awk -F" " '{print $1}'``
    local avg_mb_bandwidth=``echo $bw_list | awk  -F" " '{print $2}'``
    local sum_mb_bandwidth=``echo $bw_list | awk  -F" " '{print $3}'``

    echo_result $vol $bs $separately_count $avg_bandwidth $avg_mb_bandwidth $sum_mb_bandwidth
}

test_multiple_bs(){
    local vol=$1
    local separately_count=$2
    local i=1
   # test_single_bs $vol 100M $separately_count
     i=1; while [ $i -le 512 ]
        do
            test_single_bs $vol NULLk $separately_count
            i=$(($i*2))
        done
     i=1; while [ $i -le 512 ]
         do
             test_single_bs $vol NULLM $separately_count
             i=$((i*2))
         done
}

vol=$1
separately_count=$2
mkdir -p ./log
test_multiple_bs $vol $separately_count
run.sh
#!/bin/bash

echo running multiple file test

./multiple.sh /client/gluster/dt8 8 >> dt8-8.log
./multiple.sh /client/gluster/dt2dp4rd1 8 >> dt2dp4rd1-8.log
./multiple.sh /client/gluster/dp8rd2 8 >> dp8rd2-8.log
./multiple.sh /client/gluster/dt4rp2 8 >> dt4rp2-8.log
./multiple.sh /nfs/gluster-test 8 >> home1-8.log

echo running single file test

./multiple.sh /client/gluster/dt8 1 >> dt8-1.log
./multiple.sh /client/gluster/dt2dp4rd1 1 >> dt2dp4rd1-1.log
./multiple.sh /client/gluster/dp8rd2 1 >> dp8rd2-1.log
./multiple.sh /nfs/dt4rp2 1 >> dt4rp2-1.log
report.sh
#!/bin/bash
log_file_list=``ls | grep ".log"``
length=``echo $log_file_list | wc -w``
echo 'logfile, volume_type, bs, bandwidth[Bytes/s]'
for filename in $log_file_list
do
    cat $filename | awk -v filename="$filename" '{gsub("bs=","",$0); gsub(",","",$0); print  filename ", " $2 ", " $8}'
done
실험 결과
단일 파일 I/O 속도 측정 결과
데이터 크기를 1kB부터 512MB까지 2배씩 증가하면서 I/O속도를 측정했습니다. glusterfs는 동일한 스팩의 서버에서 환경을 구성하고 실험 했지만, nfs는 현재 사용중인 서버(16TB * 12, RAID6, 총 146TB)환경에서 실험했기 때문에 정확한 비교에 한계가 있음을 밝힙니다.
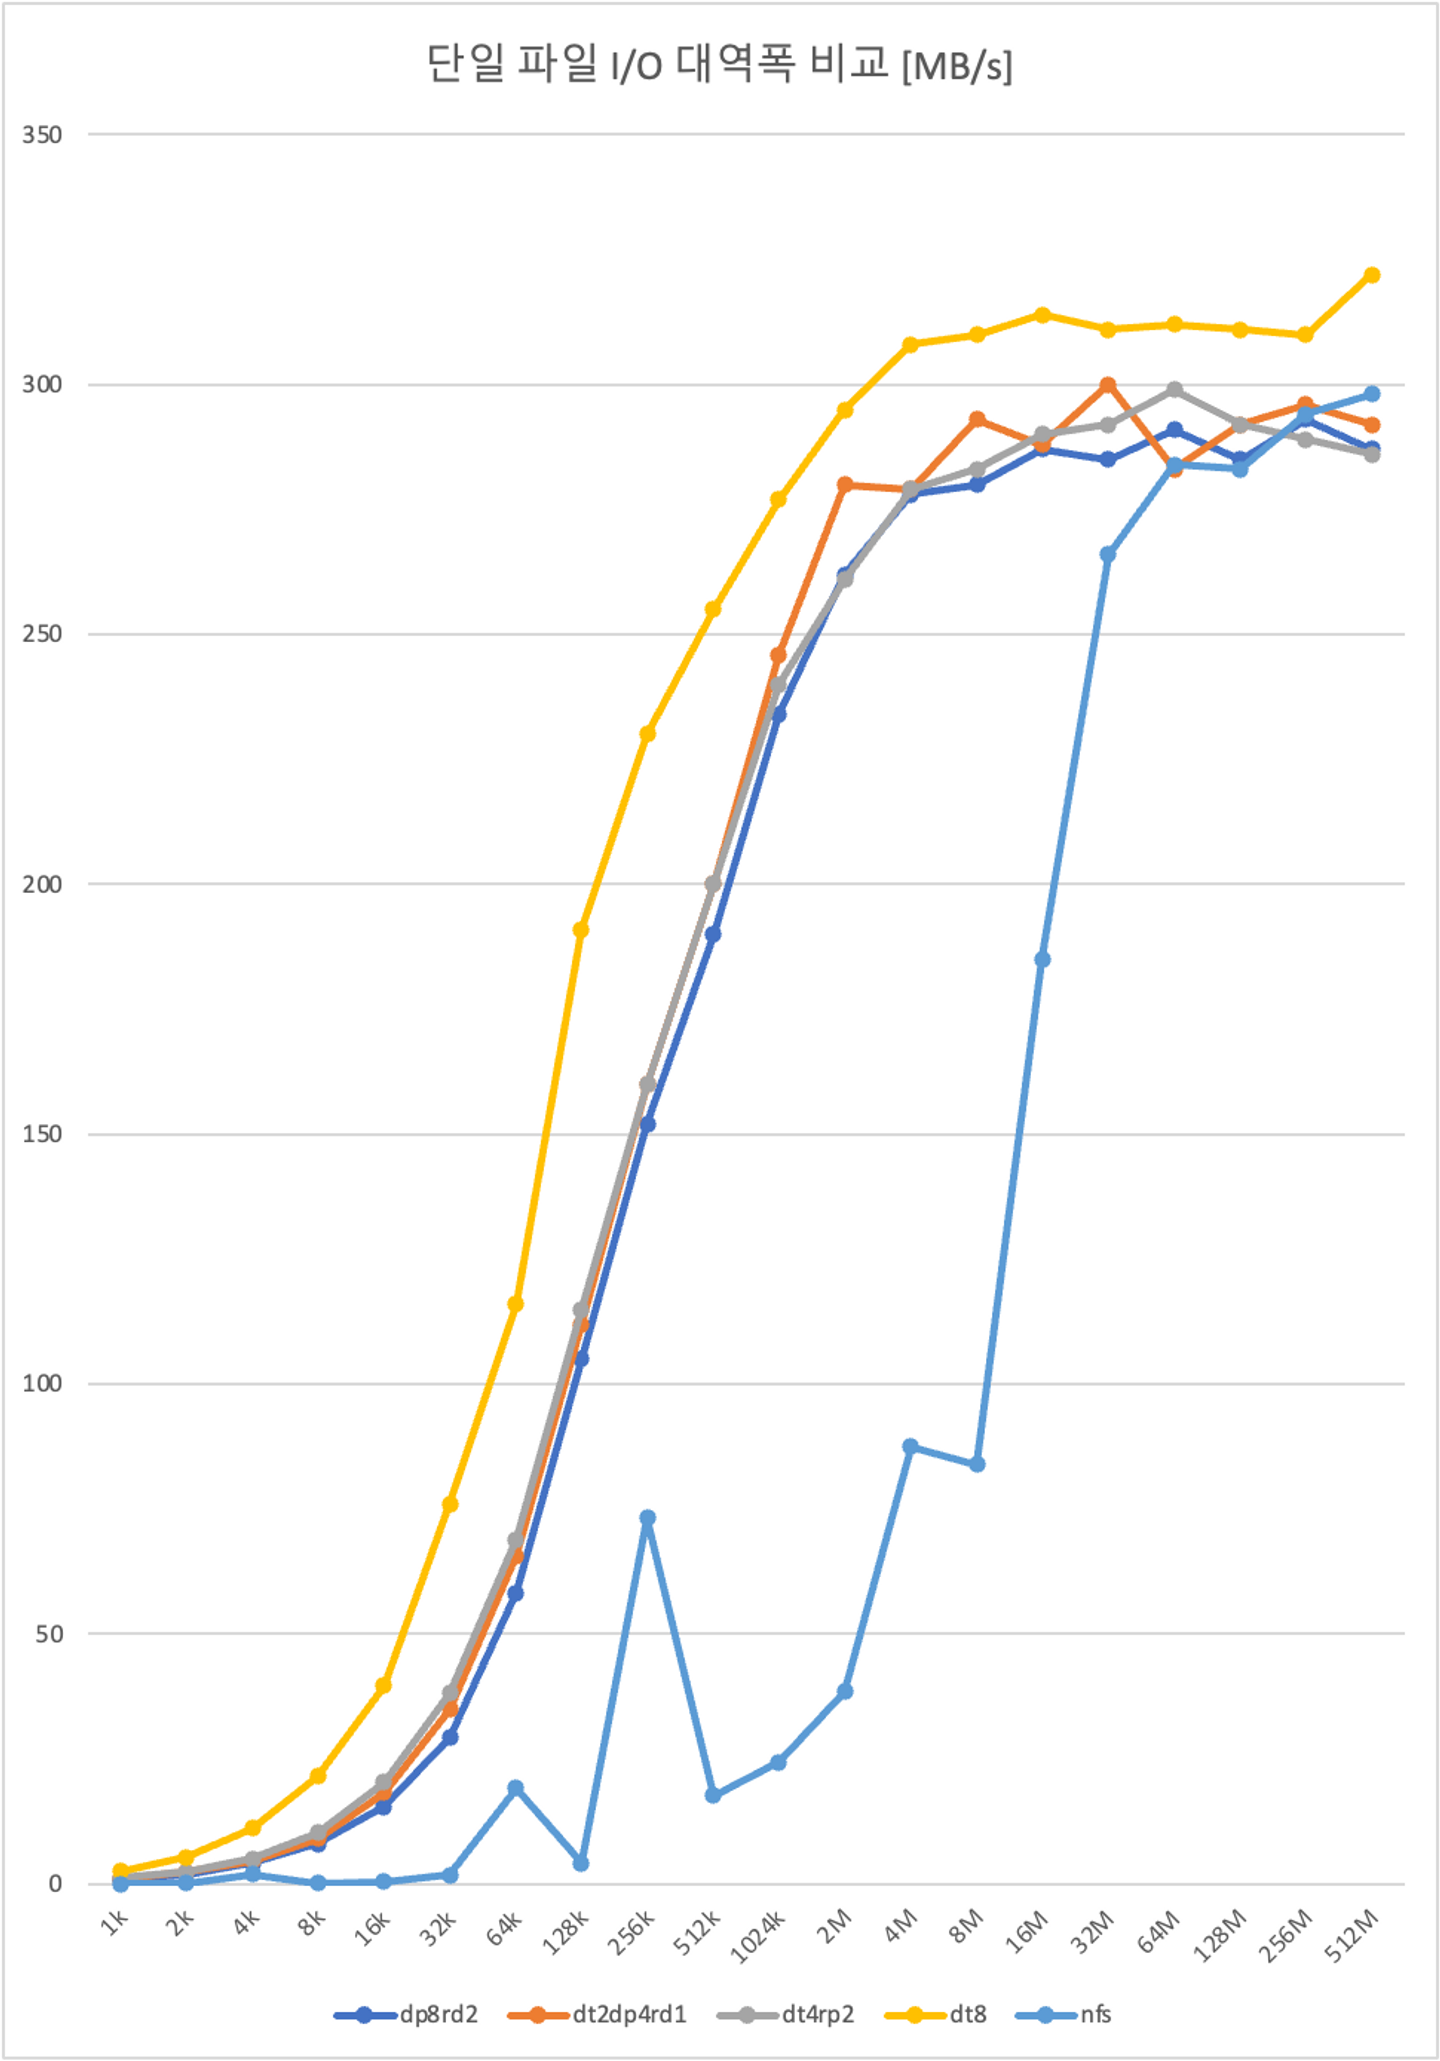
단일 파일에 대해서는 파일의 크기가 증가하면서, I/O 속도가 증가하다가 300MBps로 수렴하는 모습을 보입니다. 파일 자체를 분할하거나, 복제하지 않는 distribute 8 클러스터의 속도가 가장 빠르며 다른 클러스터는 유사한 성능을 갖습니다.
다중 파일(8개 동시 수행) I/O 속도 측정 결과
현재 구축하는 스토리지는 동시에 여러명의 사용자가 접근하기 때문에 여러개의 파일을 동시에 병렬적으로 처리할 때, I/O 성능을 평가하는 것이 적합합니다. linux Named Pipe (FIFO)를 사용하여 파일을 읽고쓰는 작업을 동시에 실행하고 총 대역폭을 계산했습니다. (모든 I/O 작업을 완벽히 동시에 실행할 수는 없습니다. I/O 작업을 실행하는 간격은 0.05ms입니다. 이후에 다시 다루겠습니다.)
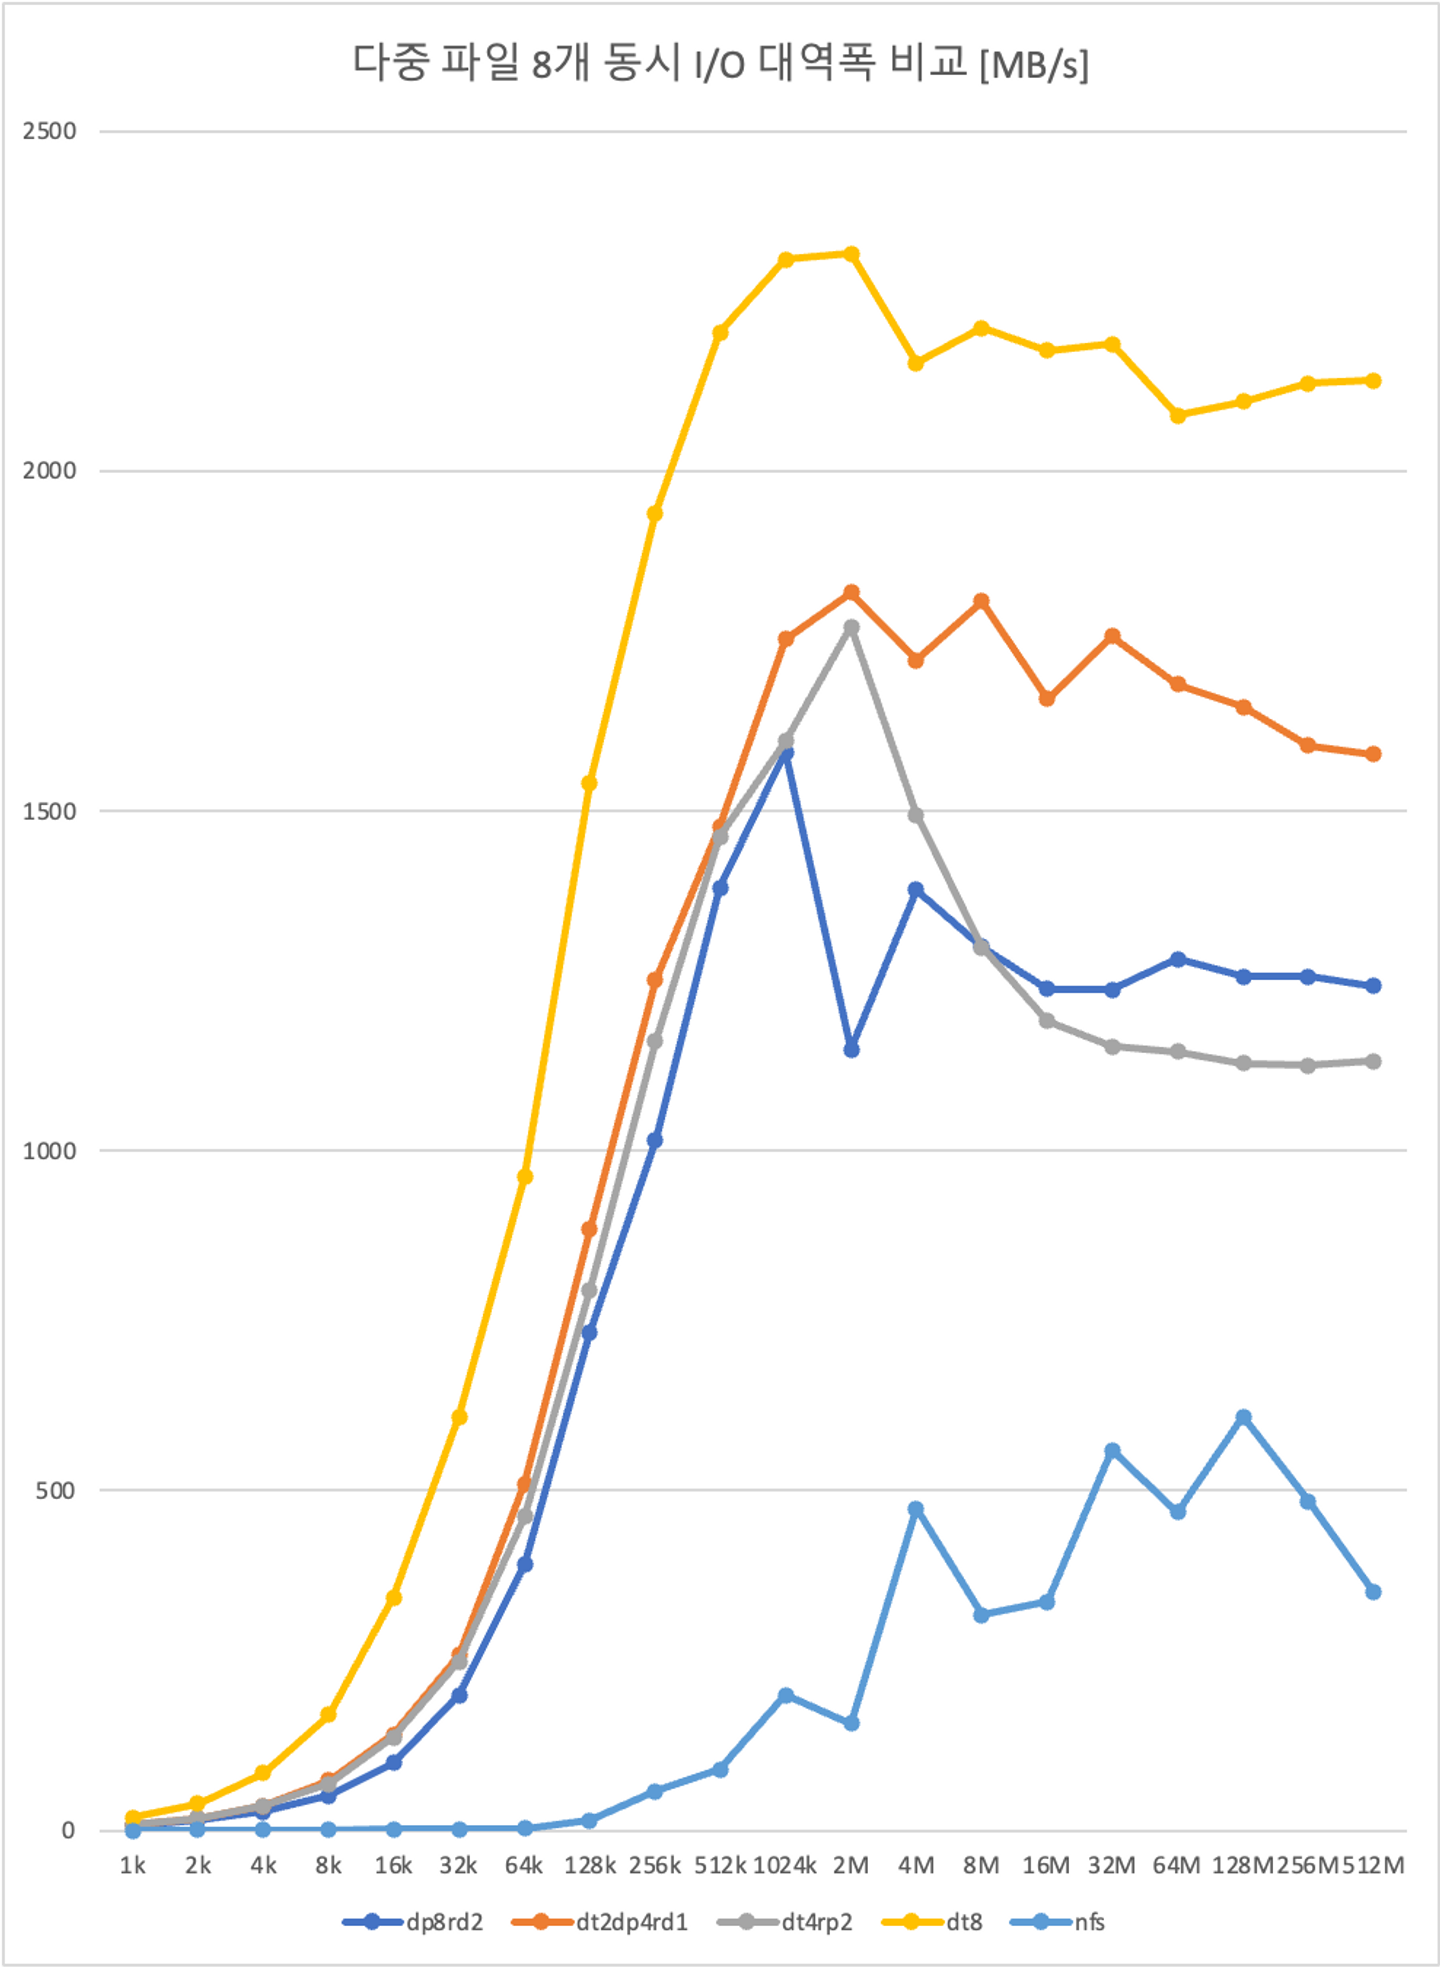
동시에 파일을 읽고쓰는 작업은 예상대로 distribute 8 에서 가장 높은 성능을 보입니다. 파일의 크기가 작을 경우, 파일 I/O 시간이 매우 짧기 때문에 (distribute 8에서 1MB를 쓰는데 걸리는 시간 1 ms) 서브 프로세스를 실행하는 시간이 실험에 영향을 줄 수 있습니다. 따라서 데이터 크기가 2MB 이상인 구간에서 성능을 평가하는 것이 적합합니다. 2MB 이상 구간에서 파일 I/O 성능과 스토리지 용량을 정리하면 다음과 같습니다.
| nfs | distribute 8 | dispersed 8, redundancy 2 | distributed 2, dispersed 4, redundancy 1 | distributed 4, replicated 2 | |
|---|---|---|---|---|---|
| brick 수 | - | 8 (204 TB) | 8 (204 TB) | 8 (204 TB) | 8 (204 TB) |
| 스토리지 용량 | 146 TB | 204 TB | 154 TB | 153 TB | 102TB |
| 단일 파일 | 40 ~ 300 MBps | 310 ~ 320 MB/s | 290 MB/s | 300 MB/s | 290 MB/s |
| 다중 파일(8개 동시) | 300 ~ 600 MBps | 2.1 ~ 2.3 GB/s | 1.2 ~ 1.6 GB/s | 1.5 ~ 1.8 GB/s | 1.1 ~ 1.7 GB/s |
-
nfs
I/O 컨트롤러의 병목 현상으로 인해서 다중파일을 I/O 할 때, 분산 파일 시스템 대비 대역폭이 크게 감소하는 보습을 보입니다.
-
distributed 8
단일 및 다중 파일 모두 가장 높은 성능을 보입니다. 다중파일을 동시에 입출력할 때, I/O 컨트롤러 8개를 동시에 사용하기 때문에 대역폭이 8배 증가합니다. (8 * 300 MBps = 2.4GBps )
-
dispersed 8, redundancy 2
다중 파일에서 nfs 대비 300% 가까이 성능이 향상되지만, 파일을 분할하고 erasure code를 생성하는 데 필요한 overhead로 인해서 distributed 8 보다는 낮은 성능을 보입니다.
-
distributed 2, dispersed 4, redundancy 1
dispersed 8 redundancy 2에 비해서 파일 분할하는 연산량이 적기 때문에, overhead 또한 감소합니다. 또한 파일들을 2개의 dispersed set에 저장함으로 dispersed 8에 비해 다중 파일 성능이 더 높게 측정됩니다.
-
distributed 4, replicated 2
파일을 복제하는 overhead로 인해서 distributed 8 보다는 낮은 성능을 보이며, 특히 파일의 크기가 증가할 수록 성능이 감소합니다.
결론
성능 측면에서는 단일 및 다중 파일 모두 distributed 8이 가장 우수합니다. 하지만 distributed 8은 하나의 볼륨이라도 고장난다면, 전체 볼륨을 복구할 수 없다는 치명적인 단점을 가지고 있습니다. 이러한 문제로 distributed 8을 사용하지 않기로 결정했습니다. 나머지 3개의 후보 중 가장 성능이 우수 하면서, 최대 2개의 볼륨이 고장 나더라도 모든 데이터를 복원할 수 있으며, 전체 하드디스크 용량의 75 %를 사용할 수 있는 distributed 2, dispersed 4, redundancy 1 조합 gluster 볼륨을 사용하기로 결정했습니다.
시행착오
실험을 설계할 때, 동시 파일 I/O 작업을 위해서 linux background process (&) 실행을 사용했습니다. 하지만, subprocess를 생성하는 overhead가 한 파일을 쓰는 속도와 유사하여 대역폭이 매우 크게 측정되는 문제가 있었습니다. linux의 Named Pipe (FIFO)를 이용해서 문제를 해결할 수 있었습니다. 우선 8개의 프로세스를 모두 생성하고 pipe에 값이 들어오면 동시에 I/O 작업을 시행하도록 코드를 수정 했더니, 각 작업간 간격이 0.81 ms에서 0.05ms로 94% 감소했습니다. 각 subprocess마다 값을 전달하기 위해 완벽히 동시에 작업을 수행할 수는 없지만, 유의미한 실험결과를 얻을 수 있다고 판단하여 아래 방법을 통해서 실험을 진행했습니다.
& background 실행 overhead
- 실행 간격: 0.81ms
#!/bin/bash

NUM_PROCESSES=100
for i in $(seq 1 $NUM_PROCESSES); do
        now_time=$(date +%N)
        echo $now_time
done

# 차이: 81m 337u 966n / 100 = 0.81ms
Named Pipe (FIFO) 를 사용한 subprocess 동기화
- 실행 간격: 0.055ms
#!/bin/bash

NUM_PROCESSES=100
PIPE=my_sync_pipe
mkfifo $PIPE
for i in $(seq 1 $NUM_PROCESSES); do
    (
       # Named Pipe에서 데이터를 읽기 위해 대기
        read -r < $PIPE
       # 실제 명령어 실행
        start_time=$(date +%s%N)
        echo $start_time

    ) &
done

# 모든 프로세스가 Named Pipe에서 대기 상태일 때 데이터를 보냄
sleep 2 # 대기 상태를 보장하기 위한 임시 슬립
for i in $(seq 1 $NUM_PROCESSES); do
    echo "Go" > $PIPE
done

wait # 모든 백그라운드 프로세스가 완료될 때까지 대기
rm $PIPE

# 차이 5m 598u 532ns / 100 = 0.05ms
Reference
- https://docs.gluster.org/en/latest/
- https://access.redhat.com/documentation/en-us/red_hat_gluster_storage/3.1/html/administration_guide/chap-recommended-configuration_dispersed
- https://access.redhat.com/documentation/en-us/red_hat_gluster_storage/3.3/html/administration_guide/chap-red_hat_storage_volumes-creating_dispersed_volumes_1
- https://portal.nutanix.com/page/documents/kbs/details?targetId=kA07V0000004U9TSAU
- https://en.wikipedia.org/wiki/Named_pipe
- https://linuxhint.com/send-process-background-linux/
- https://man7.org/linux/man-pages/man1/dd.1.html